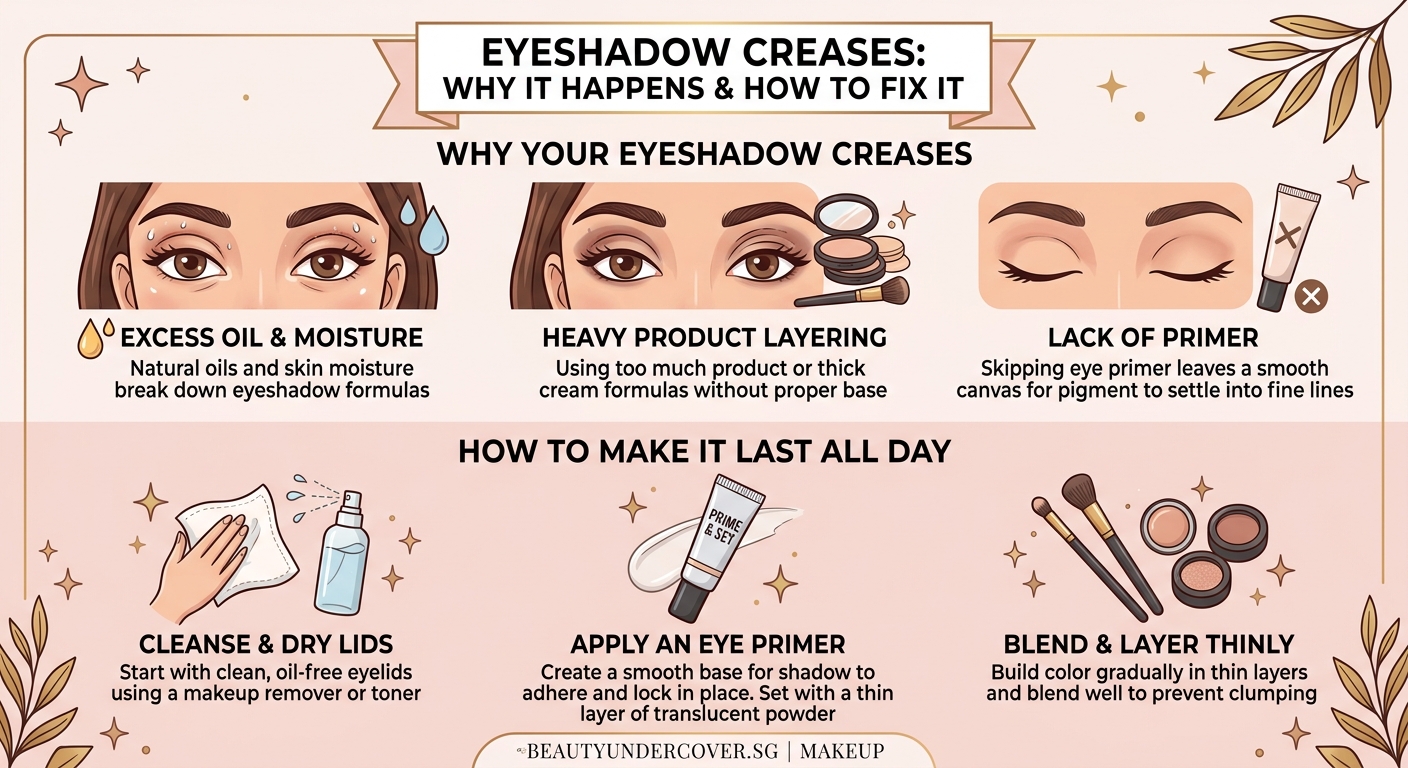
You apply your eyeshadow perfectly in the morning. By lunch, it’s settled into every crease on your lids. That frustration is real, and you’re not imagining it. Eyeshadow creasing happens to everyone, but it doesn’t have to ruin your day. The good news? You can fix this problem with a few simple changes to your routine.
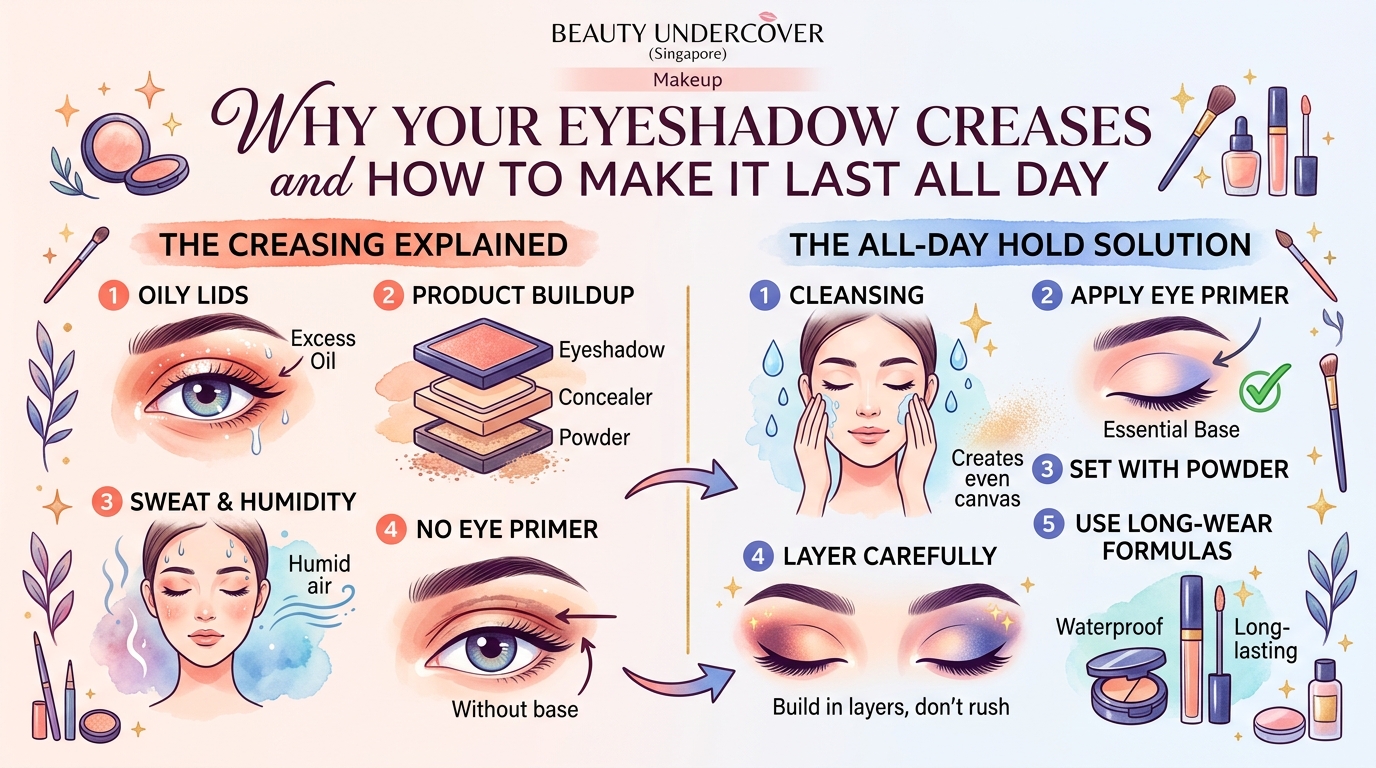
Eyeshadow creasing happens when oils, moisture, and product buildup accumulate on your eyelids throughout the day. To prevent it, start with clean, dry lids, use an eyeshadow primer, set it with powder, apply thin layers of shadow, and choose long-wearing formulas. These five steps work together to create a smooth, lasting base that keeps your eyeshadow looking fresh from morning to night.
Why eyeshadow creases in the first place
Your eyelids are constantly in motion. Every blink, every facial expression creates movement. That movement alone wouldn’t cause problems, but add natural oils, sweat, and humidity to the mix, and you’ve got the perfect recipe for creasing.
Oily skin makes this worse. The sebum produced by your skin breaks down makeup throughout the day. Even if you have dry skin elsewhere, your eyelids can still produce enough oil to cause creasing.
Product buildup matters too. If you’re applying moisturizer or sunscreen near your eyes in the morning, those products can migrate onto your lids. They create a slippery surface that prevents eyeshadow from gripping properly.
Temperature and humidity play a role. Hot weather increases oil production. Humid conditions prevent makeup from setting properly. That’s why your eyeshadow might look perfect in winter but crease by noon in summer.
The right way to prep your eyelids
Proper preparation makes the biggest difference. Skip this step, and even the best products won’t save you.
Start with clean lids. Wash your face as usual, but pay extra attention to your eyelids. Use a gentle cleanser to remove any residue from the night before. Pat dry completely. Any moisture left behind will interfere with primer adhesion.
Let your skincare absorb fully. After you build your morning skincare routine, wait at least 10 minutes before touching your eye area. This gives products time to sink in rather than sitting on the surface.
Blot your lids if needed. If your eyelids feel tacky or oily after skincare, gently press a clean tissue against them. Don’t rub. Just absorb excess product.
Set the area with translucent powder. Before primer, dust a tiny amount of powder over your lids with a fluffy brush. This creates a dry canvas and helps primer adhere better.
Step by step method to prevent creasing
Follow these steps in order for the best results.
1. Apply eyeshadow primer correctly
Eyeshadow primer is not optional. It creates a tacky base that grabs onto powder products and prevents them from sliding around.
Squeeze out a rice grain sized amount. That’s enough for both eyes. Too much primer can actually cause creasing because it takes too long to dry.
Warm it between your fingertips first. This makes it easier to spread and helps it blend seamlessly.
Pat it onto your lids using your ring finger. Start at the inner corner and work outward. Cover the entire lid from lash line to brow bone. Don’t forget the outer corners where creasing often starts.
Let it dry for 30 seconds. The primer should feel slightly tacky, not wet. If it’s still slippery, wait another 15 seconds.
2. Set your primer with powder
This step is the secret many people skip. Setting powder locks everything in place.
Use a small, flat brush to press translucent powder or a skin-toned eyeshadow onto your primed lids. Press, don’t sweep. Sweeping can remove the primer you just applied.
Focus on areas that crease first. That’s usually the natural crease of your eyelid and the outer corners.
Tap off any excess powder before moving to the next step.
3. Build your eyeshadow in thin layers
Thick layers of eyeshadow are more likely to crease. Thin layers stay put.
Start with a transition shade in your crease. Use a fluffy brush and very little product. Build gradually.
Press darker shades onto your lid rather than sweeping them. Pressing packs the pigment onto the base you created. Sweeping can disturb the layers underneath.
Blend between each layer. This prevents harsh lines and creates a seamless finish that moves with your skin instead of cracking.
4. Use cream products strategically
Cream eyeshadows can be tricky. They’re beautiful when fresh but prone to creasing if not set properly.
If you want to use cream shadow, apply it over primer, then immediately set it with a matching powder shadow. This locks the cream in place while maintaining the intensity.
Avoid layering multiple cream products. Stick to one cream element, like a cream base or a cream shimmer on the center of your lid.
5. Finish with setting spray
Setting spray is your final insurance policy. Hold the bottle 8 to 10 inches from your face and mist lightly. Let it dry completely before opening your eyes wide or looking down.
Choose a setting spray designed for makeup longevity, not just hydration. Look for products that mention “long wear” or “matte finish” on the label.
Product types that resist creasing better
Not all eyeshadows are created equal. Formula matters as much as application technique.
Powder eyeshadows are the most crease-resistant when applied correctly. They work with your primer and setting powder to create a stable base.
Baked eyeshadows contain less oil in their formula. They’re pressed with heat, which creates a denser texture that resists creasing.
Long-wear cream shadows are formulated to dry down completely. Once set, they don’t budge. Brands specifically market these for all-day wear.
Eyeshadow sticks can work if you set them immediately. The key is not letting them stay creamy on your lids.
Avoid very emollient cream shadows for all-day wear. Save those for special occasions when you can touch up.
| Product Type | Crease Resistance | Best For | Must Set? |
|---|---|---|---|
| Powder shadow | High | Daily wear, all skin types | Yes |
| Baked shadow | Very high | Oily lids, long days | Yes |
| Long-wear cream | High | Bold looks, special events | Yes |
| Regular cream | Low | Short wear, photo shoots | Definitely |
| Shadow stick | Medium | Travel, simple looks | Yes |
Common mistakes that guarantee creasing
Even with the right products, certain habits will sabotage your efforts.
Skipping primer entirely. This is the number one mistake. Primer creates the foundation for everything else. Without it, you’re building on shifting sand.
Using too much product at once. Whether it’s primer, powder, or eyeshadow, more is not better. Thick layers crack and crease.
Not letting products dry between steps. Patience matters. Each layer needs time to set before you add the next one.
Touching your eyes throughout the day. Your fingers transfer oil onto your lids. If you must touch your eyes, blot first with blotting paper.
Using the wrong primer for your skin type. Oily lids need mattifying primers. Dry lids do better with slightly tacky primers that aren’t powder-based.
Applying moisturizer or sunscreen too close to your eyes. Keep these products at least a quarter inch away from your lash line. They will migrate up onto your lids during the day.
Using expired products. Old eyeshadow and primer lose their staying power. If your primer is more than a year old, replace it.
How to fix creasing when it happens
Sometimes creasing happens despite your best efforts. Here’s how to fix it without starting over.
Keep a small brush and your transition shade in your bag. When you notice creasing, gently blend the creased area with the brush. This smooths out the line without removing all your makeup.
Blot with blotting paper first if your lids feel oily. Press gently, then blend.
If the creasing is severe, use a cotton swab to carefully remove the creased product. Apply a tiny bit of primer to that spot, set with powder, and reapply your shadow.
For a complete refresh, makeup wipes work in a pinch. Remove everything, blot your lids dry, and start fresh with primer.
The role of skincare in preventing creasing
Your skincare routine affects how well your makeup wears. What you apply in the morning shows up in your makeup’s performance by afternoon.
If you have oily lids, consider using a mattifying moisturizer on your entire face. This helps control oil production everywhere, including your eyelids.
Hydrating serums are great for your face, but keep them away from your eye area in the morning. Save hydrating eye products for your nighttime routine.
Retinol and other active ingredients can make the skin around your eyes more sensitive. If you use these products at night, make sure they’re fully absorbed before bed so they don’t transfer to your pillowcase and then back to your eyelids.
“The condition of your eyelid skin directly impacts makeup wear. If your lids are dehydrated, they’ll produce more oil to compensate. If they’re too oily, makeup slides right off. Finding balance is key.” – Makeup artist perspective
Adjusting your technique for different eye shapes
Eye shape affects where and how creasing occurs.
Hooded eyes crease where the hood meets the mobile lid. Focus your primer application on this exact spot. Use matte shadows in the crease area, as shimmer emphasizes creasing.
Deep-set eyes have more lid space that folds. Apply primer all the way up to the brow bone, not just on the mobile lid.
Prominent eyes have more exposed lid space. They’re less prone to creasing but still need primer for longevity.
Monolid eyes have a smooth surface with no defined crease. Creasing often happens at the outer corners. Apply extra setting powder there.
Budget-friendly options that actually work
You don’t need expensive products to prevent creasing. Several affordable options perform just as well as luxury versions.
Drugstore primers from brands like e.l.f., NYX, and Milani consistently rank high in performance tests. They cost under $10 and work for most skin types.
Regular translucent face powder works perfectly for setting primer. You don’t need a special eyeshadow setting powder.
Many affordable eyeshadow formulas are designed for long wear. Drugstore foundations have improved dramatically in recent years, and the same is true for eyeshadows.
The most important investment is primer. Everything else can be budget-friendly.
Testing what works for your specific situation
Everyone’s skin is different. What works for your friend might not work for you.
Test new products on a day when you’ll be home. This lets you see how they perform without the stress of being out all day with creased eyeshadow.
Take photos throughout the day. Check your eyeshadow at 2 hours, 4 hours, 6 hours, and 8 hours. Note when creasing starts and where it happens first.
Keep a simple log. Write down what products you used and how long they lasted. After a few weeks, patterns will emerge.
Consider the weather. Products that work in winter might fail in summer. You may need different routines for different seasons.
Making your eyeshadow work harder
Beyond preventing creasing, you want your eyeshadow to look good all day.
Choose colors that complement your skin tone. When eyeshadow starts to fade, it should fade gracefully rather than looking muddy or patchy.
Build your looks with staying power in mind. Intricate, multi-color looks are harder to maintain than simpler two or three color combinations.
Place your longest-wearing products in the most visible areas. If you know your outer corner always creases first, use your most bulletproof shadow there.
Match your eyeshadow finish to your skin type. Matte shadows on oily lids, satins on normal skin, and shimmer sparingly if you’re prone to creasing.
When to seek out different solutions
Sometimes standard techniques aren’t enough. Certain conditions require special approaches.
If you have extremely oily lids that nothing seems to help, talk to a dermatologist. Excess oil production can sometimes be managed with prescription treatments.
Allergies can cause watery eyes that ruin makeup. Addressing the underlying allergy often solves the makeup problem too.
Hormonal changes affect oil production. If you notice your eyeshadow suddenly creasing when it never did before, hormonal shifts might be the cause. This happens during pregnancy, menopause, or when starting or stopping hormonal birth control.
Some medications increase oil production or cause dry eyes that water excessively. If you started a new medication around the time your eyeshadow started creasing, mention it to your doctor.
Building confidence in your eye makeup
Knowing your eyeshadow will last all day changes how you feel wearing it. You stop worrying about mirrors and bathroom checks. You focus on your day instead of your makeup.
Start with simple looks as you master the technique. A wash of one color across the lid is easier to maintain than a complex cut crease.
As your confidence grows, experiment with different colors and techniques. The skills you build preventing creasing apply to any eye look you want to create.
Remember that perfect makeup isn’t the goal. Makeup that lasts through your actual life is what matters. A slightly faded eyeshadow that still looks intentional beats perfectly applied shadow that’s creased by 10 AM.
Your eyeshadow can absolutely last all day
Creasing isn’t something you have to accept. With the right preparation, products, and application technique, your eyeshadow can look as good at 6 PM as it did at 8 AM. The five core steps work together: clean lids, primer, setting powder, thin layers, and the right formulas. Master these basics, then adjust for your specific needs. Your eyes are one of the first things people notice. Make sure your eyeshadow is sending the right message all day long.