Contouring looks intimidating when you scroll through Instagram tutorials with 12 products and perfect lighting. But the truth is, you don’t need professional skills or an expensive brush collection to add dimension to your face. You just need the right approach and a little practice.
Contouring for beginners means starting with just two products: a contour shade two tones darker than your skin and a blending tool. Focus on three simple areas (cheekbones, jawline, and forehead) and blend thoroughly. Skip complicated face mapping and master basic placement first. With cream formulas and a light hand, you’ll create natural definition without looking overdone or muddy.
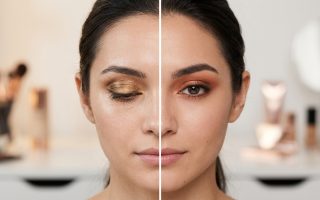
What contouring actually does to your face
Contouring uses darker shades to create shadows and lighter shades to bring areas forward.
Think of it like Instagram filters, but with makeup.
The technique mimics natural shadows your face creates in certain lighting. When you apply a darker shade under your cheekbones, it makes them look more defined. When you add a lighter shade on top of your cheekbones, they appear higher.
That’s the entire concept.
You’re not changing your bone structure. You’re just playing with light and shadow to enhance what’s already there.
Most beginner tutorials overcomplicate this by adding 15 different placement zones. You don’t need that. Start with three areas and expand later if you want.
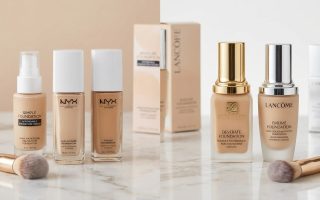
The only products you need to start
Forget the 10-product contour kits.
Here’s what actually matters:
- One contour shade (cream or powder) two to three shades darker than your natural skin tone
- One blending brush or damp beauty sponge
- Optional: a highlighting shade one to two tones lighter than your skin
That’s it.
Cream products work better for beginners because they blend more easily and look more natural. Powder formulas can look harsh if you’re still learning to blend properly.
For your first contour product, choose something with a cool undertone (slightly gray or taupe) rather than warm (orange or bronze). Cool tones mimic real shadows better.
If you’re already wearing foundation, make sure your base is set before contouring. A slightly tacky base helps cream contour blend smoothly. If you prefer working with powder contour, set your foundation with powder first.
Many people starting out also benefit from choosing the right foundation shade for your skin tone before adding contour, since your base affects how the contour looks.
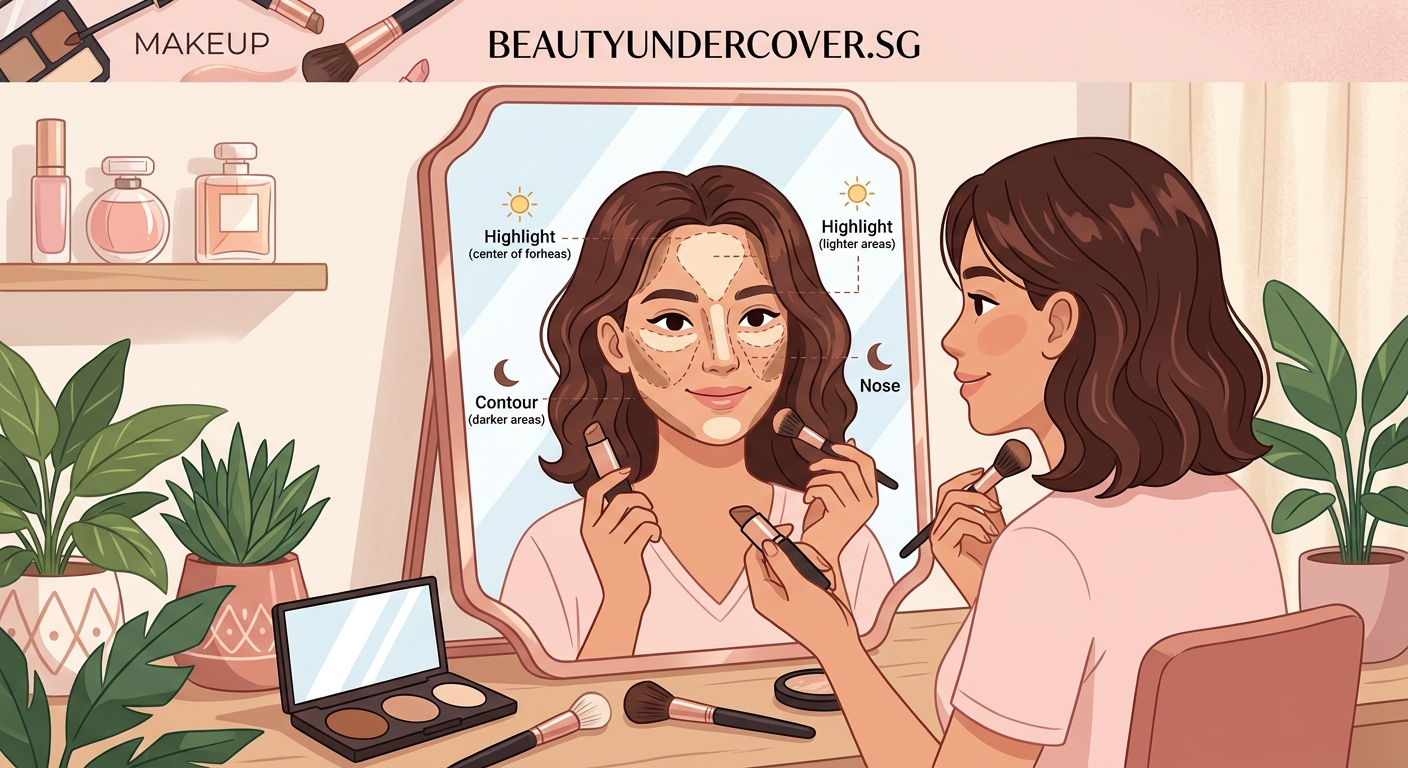
Basic face mapping for different shapes
You don’t need a degree in facial anatomy.
Just identify your general face shape and follow these simple guidelines.
Round faces: Contour along the sides of your forehead (near your hairline), under your cheekbones (from your ear toward the middle of your cheek), and along your jawline from ear to chin.
Oval faces: Focus mainly on your forehead (temples) and lightly under your cheekbones. Your face already has natural balance, so you need minimal contouring.
Square faces: Soften the angles by contouring the corners of your forehead and jaw. Blend well so there are no harsh lines.
Heart-shaped faces: Contour the sides of your forehead and the tip of your chin to balance the width at the top.
Long faces: Apply contour along your hairline and under your chin to visually shorten the face. Keep cheekbone contour minimal.
Not sure which shape you have? Stand in front of a mirror and trace your face outline on the glass with a washable marker. Step back and you’ll see the shape clearly.
Step by step application for absolute beginners

Here’s the exact process that works every time.
-
Start with your cheekbones. Suck in your cheeks slightly to find the hollow under your cheekbone. Apply your contour shade in that hollow, starting from your ear and blending toward the middle of your cheek. Stop before you reach your nose.
-
Move to your jawline. Apply contour along the underside of your jawbone, from your ear toward your chin. This creates definition and can make your face look slimmer.
-
Add to your forehead. Lightly contour along your hairline at the temples. This frames your face and makes your forehead appear smaller if needed.
-
Blend everything thoroughly. This is the most important step. Use circular motions with your brush or sponge to soften all edges. There should be no visible lines where the contour starts or stops.
-
Check in natural light. Bathroom lighting lies. Step near a window and make sure your contour looks natural, not streaky or muddy.
-
Add highlighter if you want. Apply a lighter shade on the high points: tops of cheekbones, bridge of nose, center of forehead, and chin. This is optional for beginners.
The entire process should take 3 to 5 minutes once you get comfortable.
If it takes longer, you’re probably overthinking it.
Common mistakes that make contour look obvious
Most beginners make these errors without realizing it.
Using a shade that’s too dark. Your contour should be subtle. If someone can see exactly where you applied it from three feet away, it’s too dark. Start lighter than you think you need.
Forgetting to blend. Harsh lines are the number one giveaway of beginner contouring. Spend twice as long blending as you do applying.
Contouring too close to your nose. This makes your nose look dirty, not sculpted. Keep cheek contour at least two finger widths away from your nose.
Applying contour in the wrong places. Don’t just copy what you see on social media. Different face shapes need different placement.
Using the wrong undertone. Orange or red-toned bronzers don’t create realistic shadows. Stick with cool, grayish tones.
Applying too much product at once. Build gradually. You can always add more, but removing excess is messy.
Here’s a comparison table of what works versus what doesn’t:
| What works | What doesn’t work |
|---|---|
| Building color gradually with light layers | Applying heavy product all at once |
| Cool-toned contour shades | Warm bronzers as contour |
| Blending for 30+ seconds per area | Quick swipes without blending |
| Checking in natural light | Only checking in bathroom mirrors |
| Stopping before you reach your nose | Contouring right next to your nostrils |
| Using cream formulas as a beginner | Starting with powder if you’re new |
How to choose between cream and powder formulas
Both work, but one might suit you better.
Cream contour blends into skin seamlessly. It looks natural and works well if you wear liquid or cream foundation. Apply it before setting powder. Cream formulas are more forgiving for beginners because they stay blendable longer.
Best for: dry to normal skin, natural makeup looks, beginners.
Powder contour gives more precision and lasts longer. It works better in humid weather and on oily skin. Apply it after you’ve set your base makeup with powder. Powder can look harsh if you don’t blend well.
Best for: oily skin, long wear needs, people comfortable with powder products.
You can also use both. Some people apply cream contour first for a natural base, then add powder contour on top for extra definition and staying power.
Start with cream if you’re unsure. It’s easier to fix mistakes.
Products that work well for different budgets
You don’t need expensive products to get good results.
Under $15:
* NYX Wonder Stick (cream)
* e.l.f. Putty Bronzer (cream)
* Wet n Wild MegaGlo Contouring Palette (powder)
$15 to $30:
* Fenty Beauty Match Stix (cream)
* Milk Makeup Matte Bronzer (cream stick)
* Physicians Formula Butter Bronzer (powder)
Over $30:
* Charlotte Tilbury Filmstar Bronze & Glow (powder)
* Kevyn Aucoin Sculpting Powder (powder)
* Tom Ford Shade and Illuminate (cream)
The drugstore options work just as well as luxury products for most people. The main differences are packaging and shade range.
If you have deeper skin tones, you might need to invest in higher-end brands because they typically offer better shade ranges. Fenty Beauty and Black Opal have excellent options for darker complexions.
For tools, a basic angled brush from e.l.f. or Real Techniques works perfectly. You don’t need a $40 brush to blend well.
Many beginners also find that drugstore foundations pair well with affordable contour products for a complete look.
Blending techniques that actually work
Blending makes or breaks your contour.
Use these methods depending on your product type.
For cream contour: Use a damp beauty sponge and press it into the edges of your contour. Use bouncing motions, not wiping. This pushes the product into your skin and softens edges without removing everything.
For powder contour: Use a fluffy brush with circular motions. Start at the edges and work inward. If you applied too much, use a clean brush or sponge to diffuse it.
The windshield wiper method: Move your brush or sponge back and forth in small motions along the contour line. This works well for jawline contour.
The stippling method: Gently tap your brush or sponge over the contour to blend it into your foundation. This is great for areas that need extra blending like near your nose.
“The secret to natural contour isn’t the product or the placement. It’s spending enough time blending. I tell my clients to blend until they think they’re done, then blend for 30 more seconds.” — Celebrity makeup artist Mario Dedivanovic
If your contour still looks harsh after blending, lightly dust translucent powder over it with a fluffy brush. This softens everything and makes it look more natural.
Building up intensity without going overboard
Start with less product than you think you need.
Apply a small amount and blend it out completely. Look at your face in natural light. If you want more definition, add another thin layer.
This approach prevents the muddy, overdone look that happens when you apply too much at once.
Think of it like building up a simple skincare routine. You start basic and add more only if needed.
For daytime looks, one light layer is usually enough. For evening or photos, you can build to two or three layers.
Remember that contour looks more intense in person than it does in photos. If you’re doing makeup for everyday life, go lighter than you would for Instagram.
Fixing mistakes without starting over
Messed up? Don’t panic.
If your contour is too dark: Dab a bit of your foundation or concealer over it with a sponge. Blend it in to lighten the area. You can also dust loose powder over it to tone it down.
If you applied it in the wrong place: Use a makeup wipe or micellar water on a cotton swab to remove just that section. Reapply foundation if needed, then try again.
If it looks streaky: Add more foundation over the streaky areas and blend everything together again. Sometimes you just need more base to help the contour blend smoothly.
If it looks muddy: This usually means you’ve overblended or mixed your contour with too much foundation. Set everything with powder, then lightly apply fresh contour on top.
If one side looks different from the other: Step back from the mirror. Small differences aren’t noticeable to other people. If it’s really uneven, remove the darker side and redo it to match the lighter side.
Keep makeup remover wipes nearby when you’re practicing. They make fixing mistakes much easier.
Setting your contour so it lasts
Contour can fade or move throughout the day if you don’t set it properly.
For cream contour, lightly dust translucent powder over it once you’re happy with the blend. Use a fluffy brush and a light hand. Too much powder makes everything look cakey.
For powder contour, you don’t need to set it with more powder. Instead, use a setting spray. Hold the bottle 8 to 10 inches from your face and mist lightly.
If you have oily skin, setting spray is essential. It helps everything stay in place and prevents your contour from sliding around.
Some people prefer to set their entire face first, then apply powder contour on top. This method works well if you want your contour to be very defined and long-lasting.
The technique you choose depends on your skin type and how long you need your makeup to last. For a regular day, light powder setting is enough. For all-day wear or special events, use both powder and setting spray.
Practicing without wasting product
You don’t need to do full face makeup every time you practice.
Try these methods to build your skills:
- Practice placement without product first. Use your finger to trace where you’d apply contour. This helps you memorize the placement.
- Use a light hand and minimal product during practice sessions. You’re learning technique, not creating a final look.
- Take photos after each practice session. Compare them to see your progress and identify what needs work.
- Practice on one side of your face, then remove it and try again. This saves time and product.
- Watch yourself in different lighting. Natural light, bathroom light, and overhead light all show contour differently.
Set aside 10 minutes twice a week for practice. You’ll improve faster with regular short sessions than occasional long ones.
After a few weeks, contouring will feel natural and take just a couple of minutes.
When to skip contour completely
Contour isn’t mandatory for every makeup look.
Skip it when:
- You’re doing a no-makeup makeup look and want minimal products
- Your skin is irritated or breaking out (adding more products can make it worse)
- You’re in a rush and don’t have time to blend properly
- You’re going somewhere with harsh overhead lighting (contour can look too dramatic)
- Your face already has natural definition and you prefer a fresh look
Some people never contour and their makeup looks great. It’s a personal choice, not a requirement.
If you’re dealing with skin concerns, focus on building a solid skincare routine first. Healthy skin needs less makeup overall.
Taking your skills to the next level
Once you’ve mastered basic cheekbone, jawline, and forehead contour, you can experiment with:
- Nose contouring (makes your nose appear slimmer or shorter)
- Forehead reshaping (creating the illusion of a smaller or more rounded forehead)
- Chin contouring (adding definition or making your chin appear smaller)
- Neck contouring (blending your face makeup into your neck naturally)
But don’t rush into these techniques. Master the basics first.
Advanced contouring takes more time and precision. It’s also easier to make mistakes that look obvious.
If you want to learn more complex techniques, practice them separately from your everyday routine. Try them on weekends when you have more time and aren’t worried about looking perfect.
You might also explore how different makeup trends incorporate contouring in new ways.
Your contour journey starts simple
Contouring for beginners doesn’t require expensive products or complicated techniques.
Start with one contour shade, focus on three basic areas, and spend most of your time blending. Check your work in natural light and build intensity gradually.
The makeup artists you see online have been practicing for years. Your first attempts won’t look like theirs, and that’s completely normal. Give yourself permission to learn at your own pace.
Try contouring twice this week. Notice what works and what feels difficult. Adjust your technique based on what you see in the mirror, not what you think it should look like.
Your face is unique, and your contour should enhance your natural features, not transform you into someone else. Keep it simple, keep it natural, and remember that practice makes progress.